해당 글에서는 Redux를 통해 기본적인 CRUD를 구현해본다.
redux와 react-redux 설치
yarn add redux react-reduxreducer 디렉토리 생성 후, board.js와 rootReducer.js 생성
기능별로 모듈을 만들기 위해 Ducks Pattern을 이용한다(action과 reducer를 한 세트로 작업)
//board.js
//Action Type
const SAVE = 'SAVE'; //id가 있으면 update, id가 없으면 save
const SELECTED = 'SELECTED';
const DELETE = 'DELETE'
//Action Creator Function *dispatch할때 import 해야하므로 export
export const boardSave = (dataToSave) => ({
type: SAVE,
dataToSave: {
id: dataToSave.id,
title: dataToSave.title,
content: dataToSave.content
}
});
export const boardDelete = (postId) => ({
type: DELETE,
postId
});
export const boardSelected = (postId) => ({
type: SELECTED,
postId
});
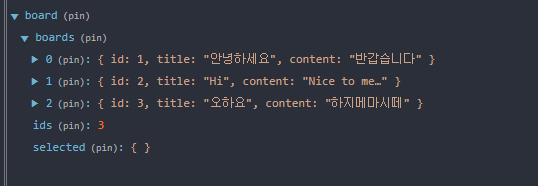
//initialState
const initialState = {
boards: [
{
id: 1, title: '안녕하세요', content: '반갑습니다'
},
{
id: 2, title: 'Hi', content: 'Nice to meet you'
},
{
id: 3, title: '오하요', content: '하지메마시떼'
},
],
ids: 3, //id 기준, 새로 추가되는 id가 있다면 하나 늘리기
selected : {} //find함수를 통해서 boards에서 선택된 데이터를 넣을 예정
}
//Reducer
export default function board(state = initialState, action) {
switch(action.type){
case SAVE:
if(action.dataToSave.id === ''){
return {
boards: state.boards.concat({...action.dataToSave, id: state.ids + 1}),
ids: state.ids + 1,
selected: {}
}
} else {
return {...state, boards: state.boards.map(post =>
post.id === action.dataToSave.id ? {...action.dataToSave} : data), selected: {}}
}
case DELETE:
return {
...state, boards: state.boards.filter( post => post.id !== action.postId)
}
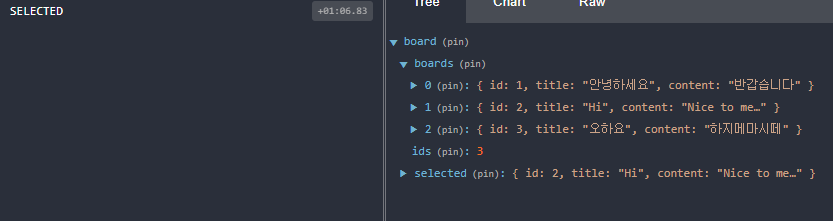
case SELECTED:
return {
...state, selected: state.boards.find(post => post.id === action.postId)
}
default:
return state;
}
}//rootReducer
import {combineReducers} from 'redux';
import board from './board';
const rootReducer = combineReducers({
board
});
export default rootReducer;index.js에서 store 생성하고 provider로 컴포넌트에서 state 사용
import React from 'react';
import ReactDOM from 'react-dom';
import './index.css'
import App from './app';
import {Provider} from 'react-redux';
import {createStore} from 'redux';
import {rootReducer} from './reducer/rootReducer';

// redux 개발도구 사용하기(chrome에서 extension 설치해야함)
const devTools = window.__REDUX_DEVTOOLS_EXTENSION__ && window.__REDUX_DEVTOOLS_EXTENSION__();

// store 생성
const store = createStore(rootReducer, devTools);

ReactDOM.render(
  <Provider store={store}>
    <App />
  </Provider>
  ,
  document.getElementById('root')
);
Store 구독하고, action 실행하기
react-redux에서 제공하는 useSelector와 useDispatch로 store를 구독하고, action을 실행시킬 수 있다.
import React, { useState } from 'react';
import { useDispatch, useSelector } from 'react-redux';
import List from '../component/list';
import UploadPost from '../component/uploadPost';
import { boardDelete, boardSave, boardSelected } from '../reducer/board';


function Board() {

    const [post, setPost] = useState({
        id: '',
        title: '',
        content: ''
    });

    const dispatch = useDispatch();

    const onDelete = (postId) => dispatch(boardDelete(postId));
    const onSave = (dataToSubmit) => dispatch(boardSave(dataToSubmit));

    const {selected} = useSelector(state => state.board);

    const postClickHandler = (postId) =>
    {
        dispatch(boardSelected(postId));
        if(JSON.stringify(selected) !== '{}') {
            setPost(selected);
        }
    }

    const changeInput = (e) => {
        setPost({
            ...post,
            [e.target.name]: e.target.value
        })
    }

    const resetForm = () => {
        setPost({
            id: '', title: '', content: ''
        })
    }

    const {boards} = useSelector(state => state.board);

    return (
        <div>
            <div>
                <table>
                    <tbody>
                        <tr align="center">
                            <td width="50">번호</td>
                            <td width="100">제목</td>
                            <td width="200">내용</td>
                        </tr>
                        {
                            boards.map(post =>
                            (
                                <List
                                    key={post.id}
                                    id={post.id}
                                    title={post.title}
                                    content={post.content}
                                    onDelete={onDelete}
                                    postClickHandler={postClickHandler}
                                />
                            ))
                        }
                    </tbody>
                </table>
            </div>
            <div>
                <UploadPost
                    onSave={onSave}
                    changeInput={changeInput}
                    post={post}
                    resetForm={resetForm}
                />
            </div>
        </div>
    );
}

export default Board;
Chrome Redux 개발도구에서 확인하기